Sunday, January 27, 2013

Vanilla Almond Granola Bars

After doing egg muffins for breakfast the last two weeks in a row, I'm ready for something different.  So here is my latest breakfast adventure:  homemade granola bars!  The great thing about these is they are totally customizable.  You can use any kind of cereal here.  I just used the Chex because that's what I had, but feel free to use anything you want, from Grapenuts to Lucky Charms.  You could also switch up the almonds and pecans for walnuts, pistachios, or whatever kind of nut you're into.  Follow the method, but switch out the ingredients for whatever you've got in your pantry.

The key is to incorporate ingredients with varying textures.  The big cereal squares and almond chunks contrast beautifully with the little bitty flax seeds and the finely chopped pecans.  That, my friends, is what makes a gourmet granola bar.  They're crunchy and sweet and toasty and pretty much everything you could ever want.  At least in a granola bar.

Vanilla Almond Granola Bars


Ingredients:

3 cups old fashioned oats
2 cups Rice Chex cereal, kinda crushed
1/4 cup flax seeds
2 Tbsp butter
1 Tbsp vegetable oil
1/2 tsp salt
1/2 cup dark brown sugar
1/3 cup molasses
2 Tbsp water
1/3 cup honey
1 & 1/2 tsp vanilla extract
1/4 cup chopped pecans
1/2 cup plain almonds, roughly chopped


Preheat oven to 350.  Line a cookie sheet with foil.

In a large microwave-safe mixing bowl, melt butter.  Once melted, add the oil and the salt.


To the butter/oil mixture, add the oats.  Toss to coat.


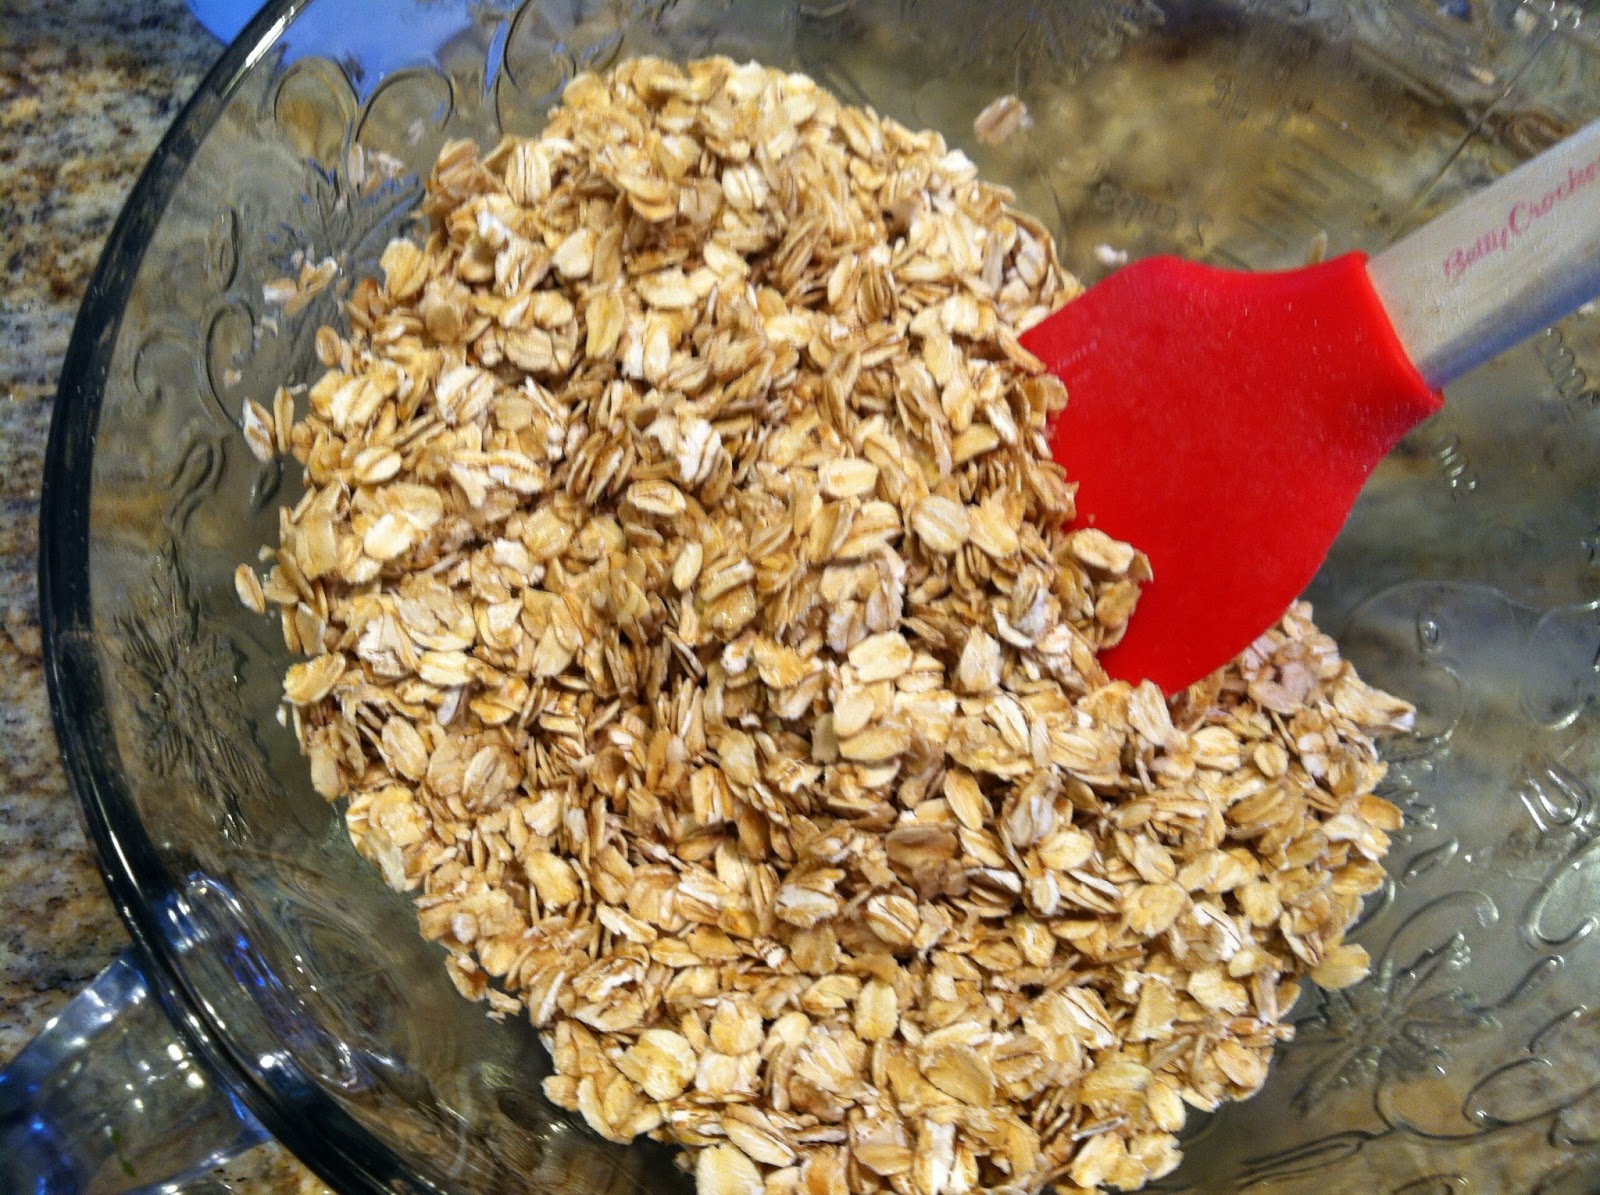
Spread the oats evenly on the cookie sheet.


Bake for 18-20 minutes, stirring twice to keep from burning.  Reduce oven temp to 325.  Save your foil, and now spritz it with non-stick spray.

In a small saucepan over medium heat, combine brown sugar, molasses, water, and honey.  Stir often.  Bring to a boil, then remove from heat.  Stir in vanilla.


Now chop the almonds and pecans.  For the pecans, you want a finer chop, and the almonds, you want a rougher chop.  Ain't nothin wrong with finding an entire almond in your granola bar.

That just sounded like Honey Boo Boo.

Anyhoo, here is pre-chop:


And post chop:


Grab your large mixing bowl again.  To the bowl, add your cereal and flax seeds.


Then add the nuts.


Next add all the toasted oats.  Stir to combine.


Now pour your brown sugar and molasses mixture over the top.


Toss to coat evenly.  It should be sticky, and will look like this:


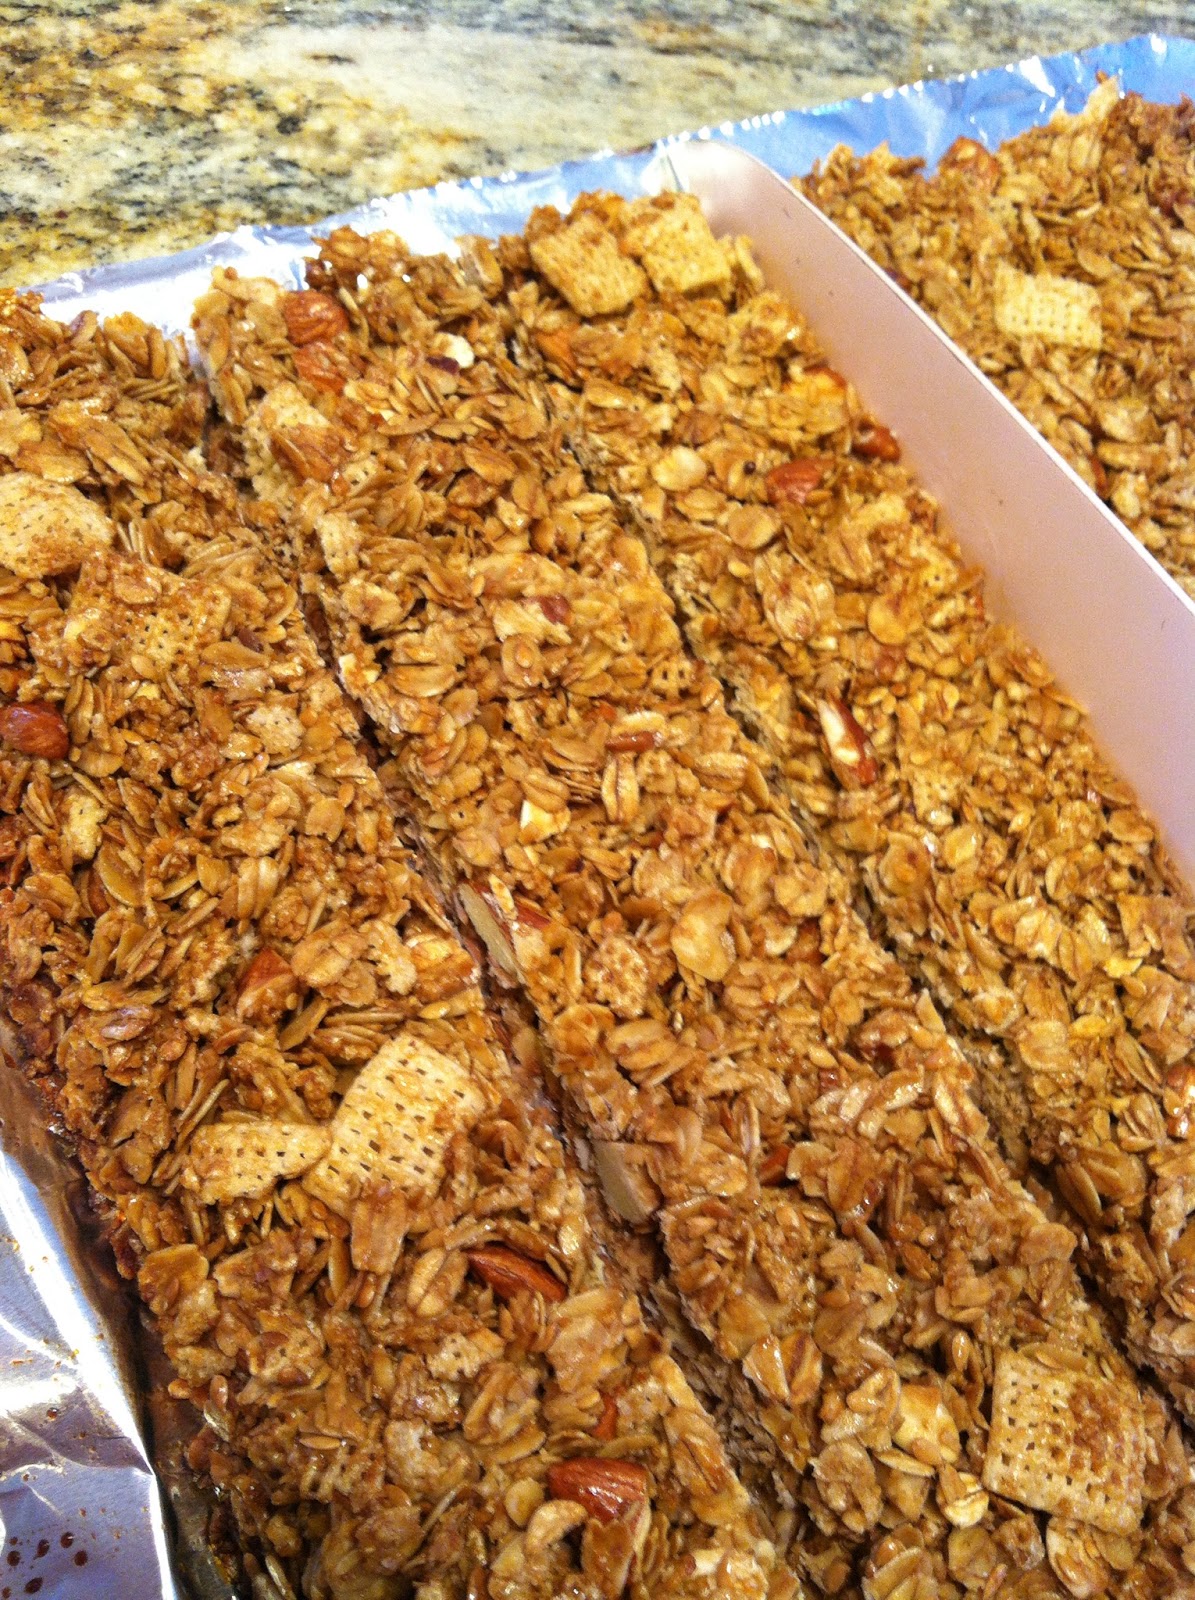
Now dump it all onto your prepared, foil-lined cookie sheet.


Press along edges evenly.  You can see that I didn't take it all the way to the right edge so that it would make thicker bars.


Bake at 325 for 20 minutes, or until just getting golden.


Allow to cool completely.  Cut into bars or squares, or you can crumble it.


Store in zip top bags or air tight food containers.  Enjoy!


Saturday, January 26, 2013

Ham & Cheese Breakfast Puffs

On Tuesday night, we were having a friend over, so naturally I made a 9 pound ham for dinner.  For three people.  Now that may seem like too much ham to you, but is there really such a thing?  I say no.  In my defense, it was the smallest ham Publix had, and I was not about to do something totally inconvenient like go across the street to Kroger to see what hams they had.  So anyway, back to my big huge ham.  Studded with cloves and glazed with brown sugar and honey, it was magnificent.

But as you may have guessed, I have a lot of ham on my hands.  I reserved some in the fridge for our dinner the rest of the week.  I froze most of it in one pound blocks, and of course I saved the bone.  Just wait til the summer.  My green beans will be the bomb thanks to this very ham bone.  But there was a little ham left in the fridge this morning that needed to be used.  So I decided it must somehow become breakfast.  After I discovered I had a puff pastry sheet in the freezer, this idea came to me.  Ham and cheese breakfast puffs!  I made it up as I went.  And it was good.  So here it is, for your eating pleasure.


When you pop this in the oven, the cheese melts and the ham caramelizes with the onion and the pastry puffs and browns...it's just wonderful.  If having too much ham is wrong, I don't want to be right.

Ham & Cheese Breakfast Puffs


Ingredients:

1 puff pastry sheet
1 cup shredded extra sharp cheddar
3/4 cup diced ham
1/4 cup diced sweet onion
1 egg


Preheat oven to 400.  Cover a cookie sheet with parchment paper and then spritz with nonstick spray.  Dice 1/4 cup of onion, which was about 1/4 of a medium onion for me.


Next, shred your cheese.  I shredded some using the medium grate, and some using the fine.


Trim any fat off the ham.  Here's what my ham looked like pre-dice:


Here's post-dice:


Combine your onion, ham, and cheese in a mixing bowl.  


On a floured surface, spread out your dough.  Cut into 4 equal sections.


At this point, I determined that my dough quarters weren't going to be big enough to accommodate my fillings. So I rolled them out to make each a little bigger and thinner.


You can't tell from the picture but I swear they are much bigger now.  OK, so now spoon on your ham and cheese filling.  Try to put most of it in the bottom left corner of each pastry square.  This will help when you fold them over.


Next, fold the top right corner of each square over the fillings so that the edges meet.


Now use a fork to press and seal your edges.


Now place each pastry onto prepared baking sheet.  In a small bowl, beat egg with 1 Tbsp of water.  Brush the top of each pastry with the egg.


Cut a little slit in each one for air to escape.  Here's what they look like:


Now place in the oven and bake 18 minutes or until golden and puffy and beautiful!  Here's what they look like when they're done.  Yay!

Serve immediately.  Enjoy!

Egg Muffins

I have a confession.  I am not a breakfast person.

I have another confession.  I am not an egg person.

Given these two facts, this recipe is probably confusing to you.  But here's the deal. I need to eat breakfast.  It makes me 62%  more pleasant to my co workers, and it makes me eat about 9% less candy (hey, every little bit helps).  And I want to like eggs.  I really do.  It bothers me that I don't like them.  I enjoy making them, and I always have no less than a dozen in my fridge ready to go.  Plus they are a great source of protein, they're cheap, and they naturally come in individual portion sizes.  I have to learn to like these things.

So over the years, I have tried and tried all different kinds of eggs all different ways, and I have come to a conclusion.  I like eggs just fine if they are mixed with enough stuff so they don't taste like plain old eggs.

Which brings me to my new little friends the Egg Muffins.  The egg is the base, but you can customize them however you like.  Bacon, sausage, cheese, chives, jalapenos, salsa - the sky's the limit.  They're also cool because they are portable.  Make them for breakfast on Sunday.  One batch makes six muffins, so that's perfect.  You can eat one for breakfast now, then you have one to take to go every day of the week.


There is a basic formula to these.  Here it is:

Any breakfast meat + any cheese + seasoning/veggie + eggs = Egg Muffins

By the way, this particular variety below is only 95 calories per muffin.  And it does not taste like a plain old egg.  It tastes cheesy, spicy, sausage-y, and delicious.

Egg Muffins


Ingredients:

1 cup turkey sausage crumbles
5 eggs
1/4 cup 2% shredded cheddar
diced jalapenos to taste
salt and pepper


Preheat oven to 375.  Spray 6 of the cups in a muffin tin.  In each sprayed cup, place equal portions of the crumbled sausage.


Then add equal portions of the cheese.


Next add jalapenos to each cup, as many as you want.


In a mixing bowl, crack your eggs.  Add salt and pepper to taste.  I also added a little dried parsley, just because.


Now beat with a wire whisk until well combined.


Pour equal portions of eggs into each muffin cup over the other ingredients.


The muffin cups should be full but not overflowing.


You can see my helper in this picture.  Hi Marles!

Bake for 30 minutes.  Serve hot.  Refrigerate up to one week.  To reheat, microwave for 30 seconds, covered.  Enjoy!


Side note:  Now that I can say I officially like eggs, I am off to conquer the only remaining food that I do not like:  celery!  That one presents a real challenge.  I've done everything from piling it with peanut butter to drowning it in bleu cheese and I still hate the stuff.  My aversion to celery is akin to Newman's hatred of broccoli (vile weed!).  So I'm going to have to get back to you on that one.

Crab Cakes with Sriracha Remoulade

Last weekend I wanted to make some kind of seafood for dinner.  Problem is, living smack dab in the middle of a land locked state, your fresh seafood options are often limited.  I checked to see what was fresh that day at the Publix seafood counter, and there wasn't much.  Catfish, previously frozen shrimp, etc, nothing sounded appealing.  But there was one thing...lump crab meat.


So crab cakes it was!  This recipe is for Maryland-style crab cakes, which means baked rather than fried, with a whole lot of crab meat and not much bread or filler.  I spiced them up with some Sriracha Remoulade, which is creamy, spicy, and delightful.  Yum!

Crab Cakes with Sriracha Remoulade


Ingredients:

1 lb lump crab meat (I use 8 oz lump, 8 oz jumbo lump)
1/2 cup bread crumbs, divided
1 tsp baking powder
1 tsp mustard powder
1 tsp dried parsley
1/8 tsp black pepper
2 tsp Old Bay seasoning
1 Tbsp light mayo
2 Tbsp butter, melted
1 tsp Worcestershire sauce
2 eggs, beaten
Sriracha Remoulade (recipe below)


Preheat oven to 375.  Drain crab meat well.


In a large bowl, combine dry ingredients, beginning with 1/4 cup bread crumbs through the Old Bay.


In a second bowl, combine wet ingredients (mayo through eggs).


Gently fold crab meat into wet ingredients.


Then gently add dry ingredients to the wet crab mixture.


Keep folding until thoroughly combined.  Cover and refrigerate 1-2 hours.  This will allow the dry ingredients to soak up a lot of the moisture and firm up some.

When you remove from the fridge, stir and evaluate the consistency   You want it to be moist, but dry enough that you could form patties.  This is where you will add the remaining 1/4 cup bread crumbs until you reach the desired consistency.


Next, form into 12 "cakes".  You want them to be loose though, more like a mound than a packed-tight cake.  I just spooned it onto a lined and sprayed cookie sheet in 12 roughly shaped little mounds.


Bake for 15 minutes.  Remove from oven and flip.  Return to oven just to finish cooking through, no more than 10 minutes.  Watch them closely so they don't get too brown on the bottom.

Serve hot, topped with Sriracha Remoulade and chives.  Enjoy!


Sriracha Remoulade

If you have never used Sriracha before, this is a great way to try it.  It's a Thai chili sauce that packs a lot of heat and a lot of flavor.  We add it to everything from meatloaf to sandwiches.  Here's what it looks like:


Some people refer to it as "Rooster Sauce."  I'm not quite sure why there's a rooster on it though.  Maybe because it's good on chicken?  Maybe it contains roosters?  Maybe it says the reason, but it's in Thai, so I can't be sure.  It's one of life's mysteries.  At least until I learn Thai.

Ingredients:

3 Tbsp light mayo
3 Tbsp sour cream
1 Tbsp Sriracha (or to taste)
1 Tbsp sweet pickle relish
1 clove garlic, finely minced
dash salt

Combine all ingredients.  Chill until ready to serve.